Paper Plate Snow Globe
Create a magical winter snow globe using a paper plate, construction paper or markers, and a clear plastic cover that turns your artwork into a fun shaker-style globe. Design any snowy scene you can imagine and finish it with either glued snow or loose, movable snow inside the globe.


Materials
2 Paper Plates
Clear Plastic Sheet, Recycled Clear Plastic Lid, or Saran Wrap
Construction Paper (various colors)
Pencil
Markers or Crayons
Glue Stick or Craft Glue
Paint (various colors)
Paint Brush
Scissors
Construction Paper for the Base
Snow Effect Options:
Small Paper Dots
Torn Pieces of White Construction Paper
Glitter
Sequins
Mini Pom-Poms
Cotton Balls
Snowflake Confetti
Step 1: Take a paper plate and cut out the center, leaving only the outer ring. This ring will act as the frame for your snow globe.
Step 2: Prepare the Paper Plate Base
Turn the second paper plate so the smooth side is facing up. This will be the background for your winter scene inside the snow globe.
Step 3: Create Your Winter Scene
You may use construction paper, paint, markers, or a combination.
Ideas for your snow globe:
– A snowman in a snowy field
– Evergreen trees dusted with snow
– A cozy winter cottage
– Arctic or woodland animals
– A holiday or winter village
If using construction paper:
– Cut and/or draw simple shapes: circles for snowmen, triangles for trees, rectangles for houses.
– Glue each piece onto the paper plate to build your scene.
If using markers:
– Draw your winter landscape directly onto the plate.
– Add extra details or color wherever you like.
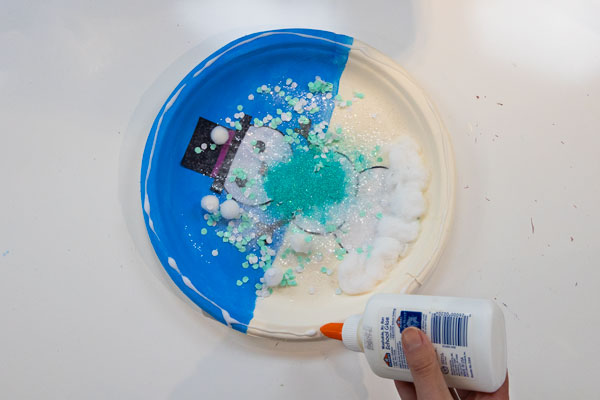
Step 4: Add the Snow
Choose glued snow, loose snow, or a combination.
Option A: Glued Snow
– Glue small paper pieces, sequins, glitter, mini pom-poms, or cotton balls around the scene to create falling or settled snow.
Option B: Loose Shaker Snow
– Place loose glitter, small paper pieces, sequins, tiny pom-poms, or snowflake confetti directly onto the plate. These pieces will move freely once the globe is sealed.
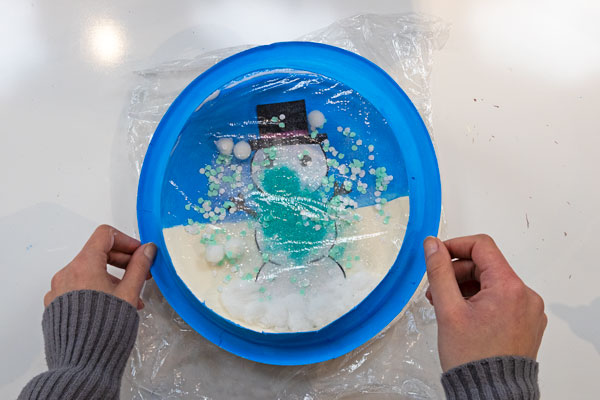
Step 5: Seal the Snow Globe
– Glue a circle around the edge of your base plate.
– Place a clear plastic sheet, recycled clear lid, or piece of saran wrap on top of the glue and over the decorated area of the paper plate.
– Press firmly and allow it to dry so that none of the loose snow escapes when shaken.
– Add another circle of glue on top of the clear sheet. Place your paper plate frame on top of it (centered evenly).
– Make sure that it is glued down securely so it frames the plastic and creates a finished snow globe edge.
– Trim any excess plastic sticking out from around the sides of your snow globe.
Step 6: Create the Snow Globe Base
– Cut a wide rectangle, trapezoid, or arch shape from construction paper.
– Add glue to the top and carefully slide it in between the two plates of your snow globe.
Personalize and Display: Write your name, the year, or a winter-themed message on the base. Display on a shelf, desk, or classroom wall.
Let the entire globe dry completely.
Shake gently to watch the loose snow swirl around your winter scene!
Tips & Variations
– Add metallic marker accents for shine.
– Create themed globes: animals, holiday scenes, snowy forests, or fantasy winter worlds.
– Make a whole series for a winter gallery display.