Paper Bag Stars
Create a paper bag star using simple materials and big imagination! In this hands-on activity, participants will transform ordinary paper lunch bags into eye-catching three-dimensional stars. Young artists can personalize their creations by adding color, patterns, and unique designs before cutting and fanning them open to reveal a beautiful starburst shape. Perfect for all ages, this project encourages creativity, upcycling, and artistic expression.
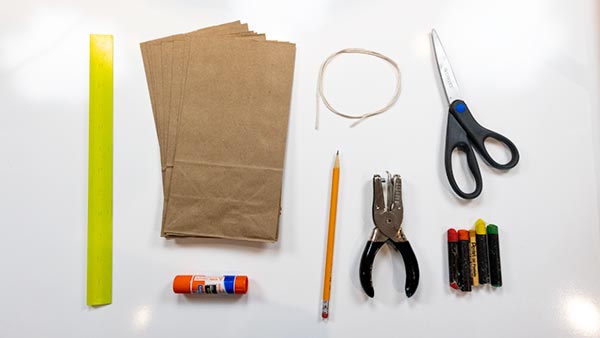


Materials:
- Paper Lunch Bags (brown or various colors and patterns)
- Hot Glue or Craft Glue
- Pencil and Ruler (optional for cutting guides)
- Markers (and other decorating supplies: crayons, colored pencils, watercolor, washi tape, stickers, metallic pens, etc.)
- Scissors
- String
- Hole Punch
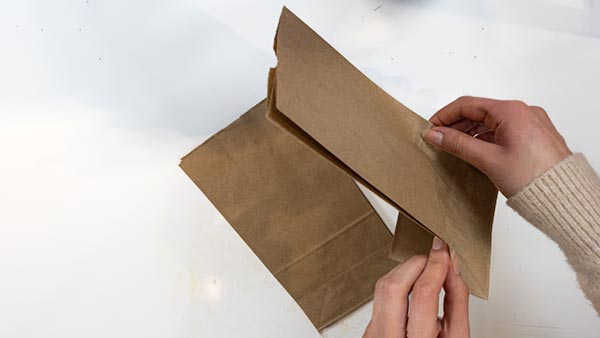
Step 1: Prepare bags. Stack your bags all facing the same way, flap facing the working surface.
Step 2: Decide on your size: 6 bags = slimmer, snowflake-like star; 8 bags = fuller star
Step 3: Decorate (Optional but fun!): Before assembling, gently open each bag and identify the visible side panels (the sides of each bag). Decorate only the sides—avoid the front/back center panels (they will be hidden once glued).
Step 4: Glue the bags: Make the Glue “T” on Bag #1. Lay one bag flat (front up). Apply glue in a T shape: One line up the center from bottom to top. One short horizontal line along the bottom edge. Tip: Don’t glue the side edges! The stars will not fan open if the sides are glued.
Step 5: Stack & repeat: Press Bag #2 directly on top, edges aligned. Repeat the T-glue and stacking for Bags #3–#6 (or #8). Keep edges square. Tap the stack on the table to align.
Step 6: Draw your cutting guide (Optional): On the top (open end) of the stack, draw a simple triangle, V-notch, or curved arch. Sharp points: draw a tall triangle. Snowflake look: add small side notches (just don’t cut past the center line).
Step 6: Cut the points: Holding the stack firmly and using sharp scissors, cut along your guide through all layers. (If it’s thick, cut half the stack at a time.) Ideas: repeating patterns, bold color stripes, dotted borders, lettered words, stencil shapes.
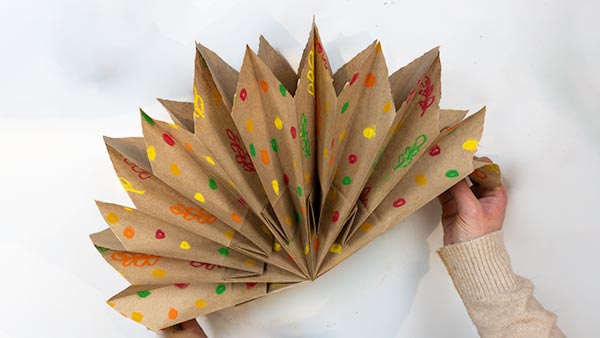
Step 7: Final glue to open: Apply the same T-glue to the top bag. Carefully fan the stack open into a star and press the first and last bags together so they meet and adhere.
Step 8: Secure & set: Hold with hands, clothespins, or binder clips for 1–3 minutes until it grabs.
Step 9: Hang: Punch a hole in one tip (or glue a loop to the back). Thread string/ribbon and hang.
Finishing options: Add a small center sticker, gem, or paper circle to both sides to hide seams (optional).
Get creative with variations!
– Edge Styles: triangle (classic), rounded (flower-like), double-V (ornate).
– Two-Tone: alternate white and brown kraft bags.
– Lacy Look: hole-punch small dots/teardrops before opening.
– Message Star: write a word/phrase across side panels so it wraps around.
Further Learning and Discussion Questions:
Discussion questions for reflection:
– Design Choices: What inspired the colors or patterns you chose for your star? How do your design choices express your personal style or mood?
– Creative Process: Which part of the process (gluing, cutting, decorating, or unfolding) felt most satisfying or surprising to you, and why?
– Problem-Solving: What challenges did you face while creating your star, and how did you adapt or adjust your approach?
– Collaboration & Inspiration: How might creating these stars as a group change the experience compared to making one alone? What ideas did you borrow or build on from others?
– Reflection: If you were to make another Paper Bag Star, what would you do differently to enhance its design, stability, or overall effect?
Further Learning
There are other types of paper stars that are still made today! Learn about two of those types that originated in Germany.
– Moravian Stars: The Moravian star is a geometric, multi‐pointed lantern design that first appeared in 19th-century Germany as a mathematical classroom project, then became a symbol of Advent and Christmas. People today still make and hang illuminated Moravian stars in holiday displays and churches. Learn more about their history and traditions here: History of the Moravian Star (Monroe County Historical Association) monroehistorical.org
– Froebel Stars (German folded paper stars): A Froebel star (or “Fröbelstern”) is a handwoven paper star made from four strips of paper, folding and weaving without glue or tape. Because the construction is purely fold-and-weave, it’s a lovely complement to glued paper bag stars. To explore folding instructions or variants, check out Make a Froebel (German) Star Ornament (Origami Resource Center) https://en.wikipedia.org/wiki/Froebel_star?utm