Spring Suncatchers
Capture the beautiful blooms and foliage of spring! Use objects from nature and contact paper to create a stunning suncatcher that glows in the light of a window.
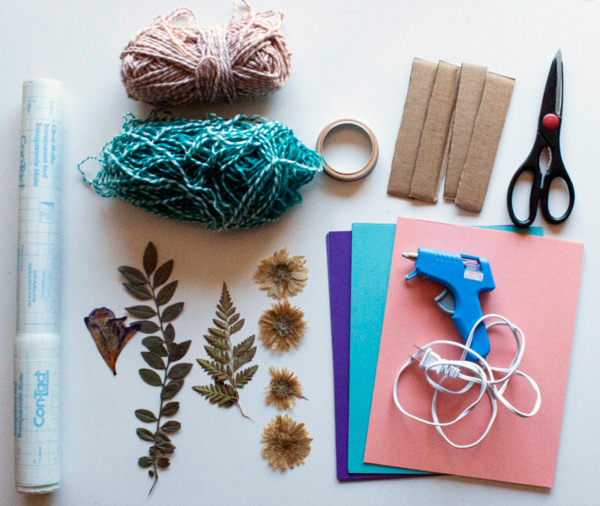
Materials:
- Dried or Fresh Botanicals
- Cardstock
- Cardboard Strips
- Mason Jar Ring
- Yarn
- Hot Glue or Craft Glue
- Scissors
Begin by choosing materials for the frame of your suncatcher. Suggestions include cardstock, cardboard strips, or a mason jar ring.
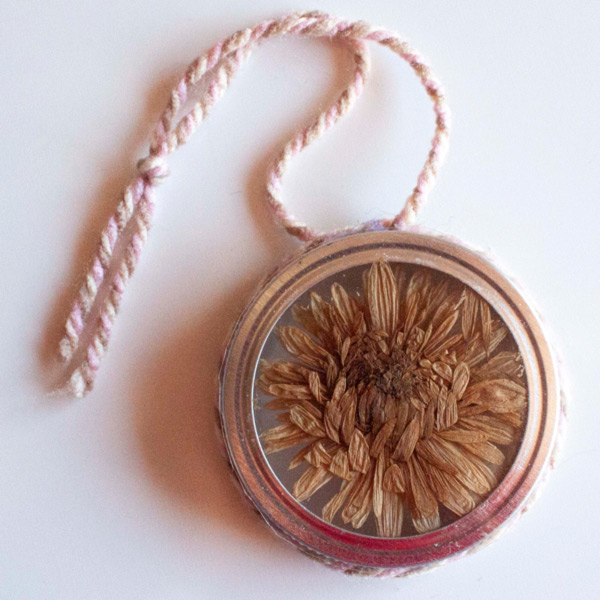
Mason Jar Ring Frame
Step 1: Gather your ring, a botanical that fits inside it, and two pieces of contact paper. Measure and trim the contact paper.
Step 2: Remove the paper backing of one sheet to expose the adhesive and place it adhesive-side up on the table. Place the metal ring on top of the contact paper and firmly push it down. Center the botanical within the frame and gently press.
Step 3: Measure and trim a second piece of contact paper to fit inside the ring. Press firmly to adhere. Trim the excess contact paper from the border of the ring.
Step 4: Use hot glue to attach a piece of yarn around the side of the ring. Tie a knot to create a loop from which to hang the suncatcher.
Cardboard Frame
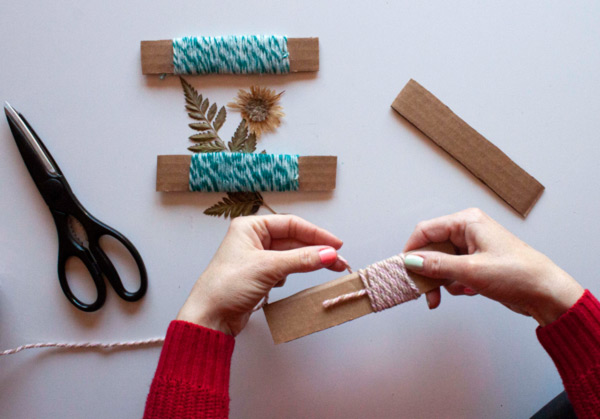
Step 1: Gather cardboard strips cut the same size.
Step 2: Tie the end of a piece of yarn to the end of one of the strips, leaving the knot about an inch from the end. Begin to wrap the yarn around the strip, keeping the loops close together. When the wrapped yarn is about an inch from the end, cut and secure it with a knot. Repeat this process with the other three popsicle sticks.
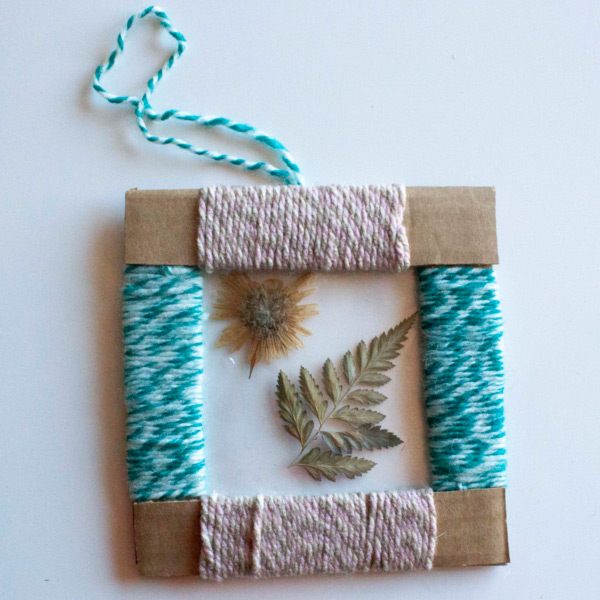
Step 3: Arrange the strips into a square frame. Place a dab of glue on the empty inch of the strip end. Place the end of a second strip on top of the glue and press to attach. Repeat this on all ends of the strips.
Step 4: Measure and cut a piece of contact paper to fit on the underside of the entire frame, including the yarn-wrapped area. Remove the paper backing from the contact paper and place it on the table with the adhesive side facing up.
Step 5: Use the frame as a guide to place the botanicals on the contact paper.
Step 6: Use the interior of the frame to measure and cut another place of contact paper. Adhere to the smaller square of the contact paper to seal the botanicals. There should still be an adhesive border exposed.
Step 7: Once the botanicals are sealed, add the frame. Trim the excess contact paper from the border.
Step 8: Use hot glue to attach a loop of yarn to the top of the suncatcher.
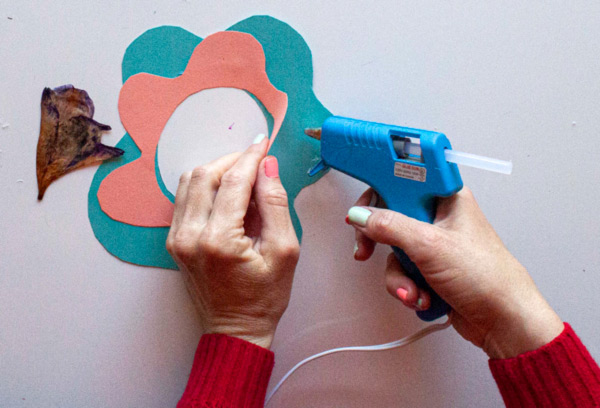
Cardstock Frame:
Step 1: Choose colored cardstock. Use your imagination to cut a border.
Step 2: Measure and trim a piece of contact paper for the back of the frame. Place the contact paper with the adhesive side up on the table.
Step 3: Place the botanicals into the center of the contact paper. Measure and cut a second piece of contact paper. Place it over the botanical to seal.
Step 4: Attach a loop of yarn to the back.
Ideas to take your spring suncatchers to the next level:
- String your suncatchers together to make a botanical window garland.
- Take your suncatchers up a notch and repurpose wooden or metal frames.
Learning and Discussion Questions:
1. The natural world has been inspiring artists for thousands of years. Historical and contemporary artists alike turn to nature for inspiration. One of the most revered woman artists was Maria Sibylla Merian (1647-1717). Merian was a Naturalist, Entomologist, and Botanical Illustrator and is received as one of the greatest botanical artists of our time. Learn more about her life and work by reading this article on The British Museum’s website.
2. As your gather botanicals to assemble your suncatchers, consider the following questions:
- What do you think about when you hear “nature”?
- What is the most beautiful thing in nature? Why?
- How does being in nature make you feel?
- Would you rather be in the mountains, on a beach, or in a rainforest?
Thank you to our sponsor, PNC Arts Alive!, for helping to make this video possible!