Paper Shamrocks
Do you have the luck of the Irish? Create a paper shamrock to decorate your favorite space to encourage good luck. Using strips of paper, learn to make decorative paper shamrocks to hang individually or string them together to create a festive garland.
Materials:
- Paper Cutter or Scissors
- Scrapbook Paper
- Hot Glue
- Hot Glue Gun
- Staple Gun
- String
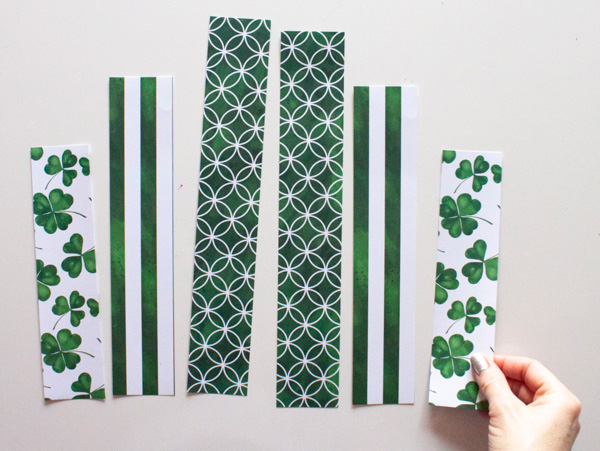
Step 1: Choose three patterns of scrapbook paper. To increase contrast within the shamrock, choose three saturations of green-based patterns.
Step 2: Trim the paper into 2″ inch strips. Trim seven strips to be 2″ x 12″ long. Trim the next pattern into six strips that are 2″ x 10″. For the last pattern, cut six strips at 2″ x 8″.
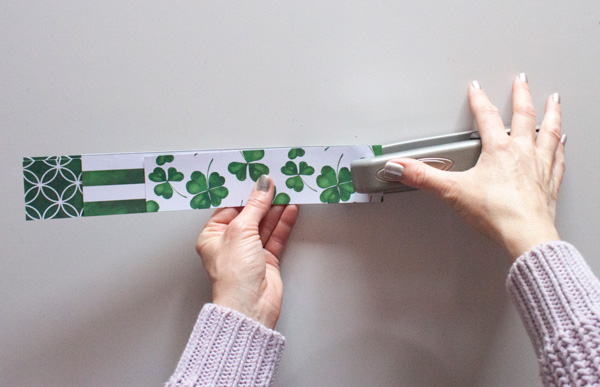
Step 3: Build the first leaf of the shamrock. Arrange the strips vertically with two 12″ strips in the center, followed by two 10″ strips on either side, and the two 8″ strips on the outside.
Step 4: Line up one of the ends of the strips. Place a staple in that end to secure the six strips together.
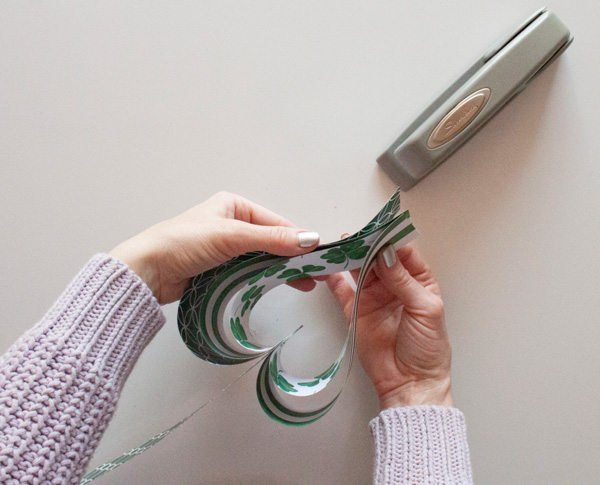
Step 5: Form the first shamrock leaf. Bend the outside strips away from the stack until their ends touch, and repeat with the other two lengths. Be sure to line up all the ends and then place a staple to secure them. Your shamrock leaf should resemble a heart shape. Repeat to build a second shamrock leaf.
Step 6: For the third shamrock leaf, assemble the strips in the same way. To hang the shamrock, place the end of a long string in between the two 12″ strips. Staple the ends leaving at least ½ inch of space between the staple and the ends of the strips. Check the string to ensure it is secure, and tie a knot at one end if needed. Continue to form the leaf as you did with the other two.
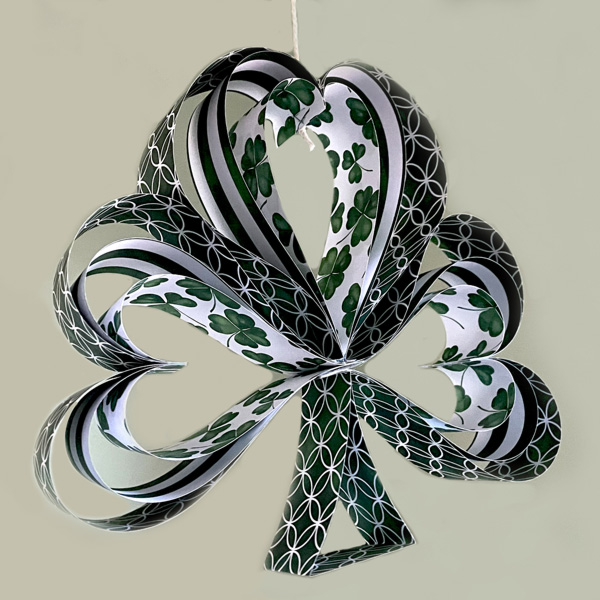
Step 7: Arrange the leaves in an upside-down “T” formation with the string leaf at the top.
Step 8: Create the stem using the remaining 12″ strip. Bring the two ends together. Fold the ends over to create two ¼” flaps. Then make two creases in the paper to create a triangle shape.
Step 9: Use hot glue to secure the ends of the two horizontal leaves together.
Step 10: Next, adjust the end of the vertical leaves to make a flat surface by finding the middle of the papers, pulling them apart, and pushing them flat.
Step 11: Place hot glue on the flattened end and press it firmly at the center of the “T,” where the two horizontal leaves meet.
Step 12: Join the shamrock leaves together using a dot of glue between each of the three leaves to make the shamrock sturdy.
Learning and Discussion Questions:
1. What is the difference between a clover and a shamrock? To learn more about the shamrock, a national symbol of Ireland, read this article posted by The Irish Family History Centre.
2. Begin or end your shamrock craft session with a storytime read-a-loud! Storybook Moments shares the story ‘Green Shamrocks’ by Eve Bunting and Joȅlle Dreidemy.
Thank you to our sponsor, PNC Arts Alive!, for helping to make this video possible!