Storybook Character Paper Bag Mask
Dive into the world of storytelling by transforming simple paper bags into masks inspired by your favorite storybook characters. Whether you’re a fan of classic fairy tales or modern adventures, this craft will surely spark your creativity and imagination for costume storytelling play. No prior crafting experience is necessary—just bring your enthusiasm and love for storytelling!
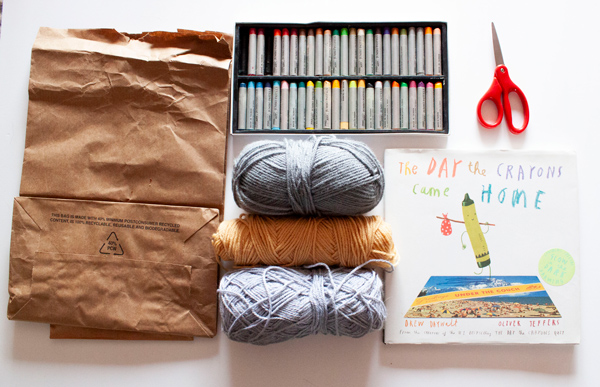
Materials:
- Brown paper bags
- Pencil
- Scissors
- Glue stick, craft glue, or tape
- Oil pastels or crayons
- Assorted decorative materials
Step 1: First, choose a storybook character that you would like to bring to life through your paper bag mask. Consider the character’s distinctive features and how you can replicate them using simple materials.
Step 2: Prepare the paper bag by flattening it on your work surface, ensuring the bottom flap faces up to serve as the base for your mask.
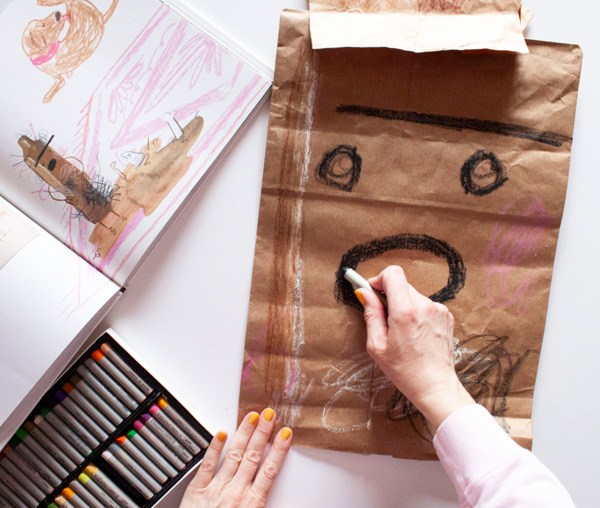
Step 3: Using a pencil, lightly sketch the outline of your chosen character’s features onto the flattened paper bag. Focus on the shape of the face, eyes, nose, mouth, and other defining characteristics.
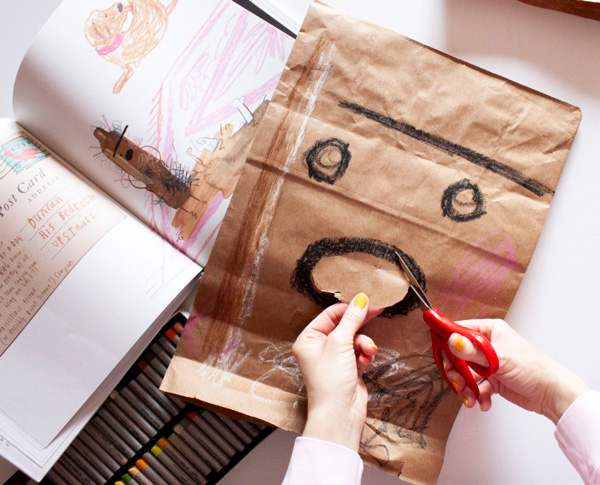
Step 4: Next, carefully cut along the sketched outlines to create the shape of your mask, leaving enough space around the edges to maintain the bag’s structural integrity. If needed, add pieces of another bag to the mask to create the proper shape for your character.
Step 5: If the features of your mask will be created using crayons or oil pastels, draw them onto the bag while the bag is still flat.
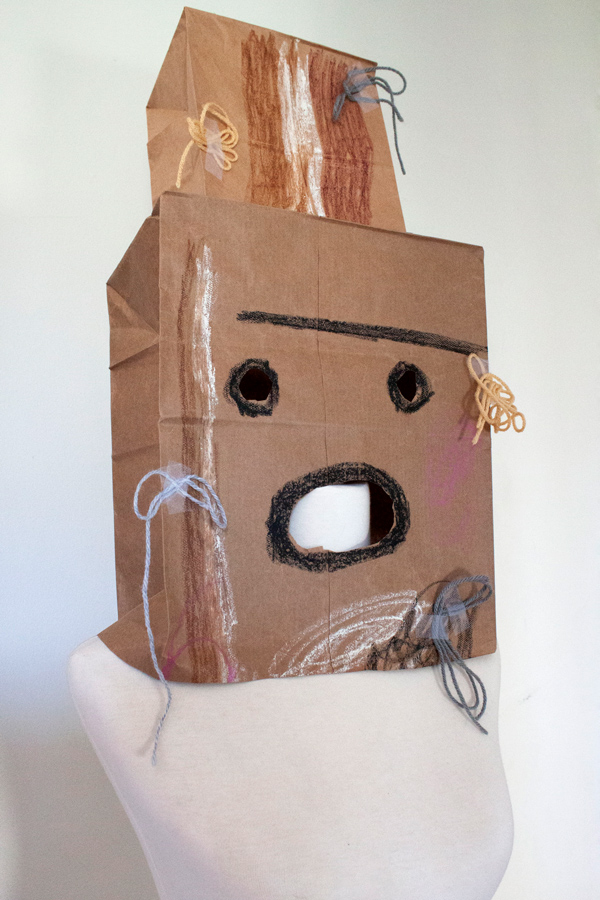
Step 6: Once your drawings are complete, gently manipulate the paper bag to give it dimension and depth. You can pinch and fold certain areas to create contours that align with your character’s facial features.
Step 7: Add facial features using construction paper or cardstock, and cut out pieces to represent the eyes, nose, and mouth of your character. Glue these features onto the paper bag mask, ensuring they align with your sketched outlines.
Step 8: Next, customize your mask by adding decorative embellishments such as googly eyes, feathers, sequins, yarn, or other materials that complement your character’s aesthetic. Use glue to secure these embellishments in place.
Step 9: Finally, allow the mask to dry. Once you’re satisfied with the design of your paper bag mask, set it aside to dry completely to ensure that all the glue and decorations adhere well before wearing or displaying it.
Step 10: Once the mask is dry, gently slide it over your face and adjust as needed. Now, you’re ready to step into the shoes of your favorite storybook character!
Ideas to take your paper bag mask to the next level:
- Texture & Dimension: Experiment with different techniques to add texture and dimension to your mask. You can crumple tissue paper or crepe paper and glue it onto the mask to create fur, scales, or other unique textures.
- Painting & Shading: Experiment with painting techniques to add shading, highlights, and depth to your mask. Use acrylic paints or watercolors to create realistic skin tones, shadows, and other effects that bring your character to life.
- Lighting Effects: Add LED lights or small battery-operated fairy lights to your mask within or around the edges for a magical glow effect.
- Photography & Sharing: Capture the creativity of your bag through photography, experimenting with different angles, lighting setups, and backgrounds. Share your photos on social media or with friends and family to inspire others.
Learning and Discussion Questions:
1. Between 1956 and 1962, American cartoonist Saul Steinberg created a series of paper bag masks that Austrian photographer Inge Morath photographed. This collaboration became known as the “Mask Series.” Click Here to learn more about Steinberg and Morath collaboration.
2. Character Exploration:
- What inspired your choice of storybook character for your paper bag mask?
- How did you capture the essence of the character in your mask design?
- Did you face any challenges in translating the character’s features into a paper bag mask? How did you overcome them?
3. Creative Process:
- Describe your creative process, from brainstorming ideas to completing your paper bag mask.
- What techniques did you use to bring your mask to life? Which ones were the most effective?
- Did your mask turn out as you initially envisioned, or did it evolve during the crafting process? If so, how?
4. Reflection and Future Projects:
- What did you learn from this paper bag mask activity? How might you apply these lessons to future crafting projects?
- Is there anything you would do differently to make another paper bag mask in the future? What improvements or changes would you make?
- How does this experience of creating a paper bag mask inspire you to explore other creative endeavors or storytelling mediums?
WheatonArts Family Art Workshop video tutorials are presented by PNC Arts Alive!